•
by acquiring an Adobe Illustrator file (File menu  Acquire)
Quick links to procedures on this page:
• |
• |
• |
• |
• |
• |
• |
• |
• |
• |
• |
You can create shapes in the following ways:
• |
by using the Pen, Quick Curve, Rectangular Shape, Oval Shape, or Text tool
|
• |
by converting a selection path to a shape
|
• |
by acquiring an Adobe Illustrator file (File menu |
• |
by pasting an Adobe Illustrator object from the Clipboard
|
As you create shapes, Corel Painter gives them default attributes for stroke and fill. For instructions on setting the default shape attributes, refer to Shapes Preferences and Setting Shape Attributes.
The shape manipulation tools are in the toolbox. By holding down Command (Mac OS) or Ctrl (Windows), you can toggle between the Shape Selection tool and any of the shape design and editing tools. Toggling makes it convenient to quickly select a wing handle or anchor point before editing it.
You can create shapes by using the Rectangular Shape tool or Oval Shape tool.
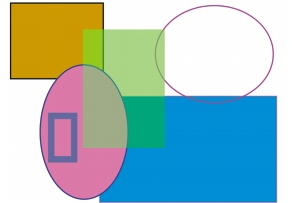
Shapes created with the Rectangular Shape tool and Oval Shape tool.
| To create a rectangle or an oval |
1 |
Choose the Rectangular Shape tool |
2 |
On the property bar, set any of the following attributes:
|
• |
Stroke check box — when enabled, lets you create a shape with a stroke, or an
outline
|
• |
Stroke Color pop-up menu — lets you choose a stroke color if the Stroke check
box is enabled
|
• |
Fill check box — when enabled, lets you create a shape with a fill
|
• |
Fill Color pop-up menu — lets you choose a color for the fill if the Fill check
box is enabled
|
3 |
Drag in the document window.
|
![]()
If you want to create a perfect square or circle, hold down Shift while you
drag.
|
The property bar and the Navigator panel display information about the
shape. To display the Navigator panel, choose Window |
The Pen tool lets you use Bézier lines to create shapes. You can use the Pen tool to draw straight lines or smooth, flowing curves, and you can create shapes containing any combination of straight and curved lines.
You can easily adjust shapes after you create them. For more information, refer to Editing Shapes. You can also convert between smooth and corner points. For more information, refer to Adjusting Curvature.
Clicking creates anchor points connected by straight line segments.

Dragging curves the segments between points.
| To draw a Pen tool shape |
1 |
Choose the Pen tool |
2 |
In the document window, click where you want to begin.
|
3 |
Do one of the following:
|
• |
To make a straight line segment, click where you want to end the segment.
Corel Painter draws a straight line between the two anchor points.
|
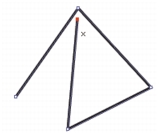
Shapes created with straight line segments.
• |
To make a curved line segment, drag to create a new anchor point and wing.
The angle and length of the wing determine the curvature of the path. The
farther you drag, the longer the wing and the deeper the curve.
|

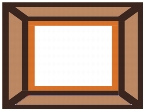
Shapes created with curved line segments.
4 |
Repeat step 3 as often as necessary, combining straight and curved segments until
you have the shape you want.
|
5 |
Finish the shape by doing one of the following:
|
• |
Close the shape by clicking or dragging the first anchor point.
|
• |
Close the shape by clicking the Close Shape button |
• |
Hold down Command (Mac OS) or Ctrl (Windows) to temporarily access the
Shape Selection tool |
![]()
You can constrain the placement of the points by snapping to the grid. For
information about displaying and snapping to the grid, refer to Using the
Grid.
|
Each click or drag adds to the path. If you unintentionally add to the path,
press Delete (Mac OS) or Backspace (Windows) to remove the last anchor
point.
|
| To add to an open shape path |
1 |
Click an endpoint with the Pen tool |
2 |
Click or drag where you want to add an anchor point.
|
You can add to a path from an endpoint only. You cannot add to a closed path,
or to the middle of an open path.
|
You can also select an endpoint by holding down Command (Mac OS) or Ctrl
(Windows) and clicking the endpoint or dragging a marquee over it.
|
The Quick Curve tool allows you to create Bézier curves by drawing freehand lines, as if you were drawing with a pen or pencil.
| To draw a freehand shape |
1 |
Choose the Quick Curve tool |
2 |
Click where you want to start the shape or line, and drag.
|
As you drag, a dotted line appears. When you stop dragging, the Quick Curve shape appears. |
If you want to close the shape, finish at the same point where you began. |
You can add to either endpoint of a Quick Curve shape by selecting the
endpoint and dragging out from it. To select an endpoint, hold down
Command (Mac OS) or Ctrl (Windows), and click the endpoint or drag
over it.
|
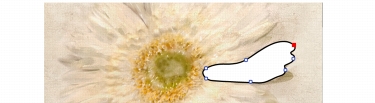
Draw freehand shapes with the Quick Curve tool.
Converting a selection to a shape enables you to edit the contour by using the Shape Edit tools. When you are satisfied with the contour, you can convert the shape outline back to a selection. For more information, refer to To convert a shape to a selection.
If you are simply scaling, rotating, or skewing a selection path, use the Selection Adjuster tool. If you must edit the profile of the curve, convert the selection to a shape.
Working from a selection path also lets you create shapes based on regions of the image. For example, if you used the Magic Wand tool to select a region of common color, you could convert the Magic Wand selection path to a shape. When the selection is pixel-based, Corel Painter may create multiple shapes.

You can convert a selection to a shape.
| To convert a selection to a shape |
1 |
Do one of the following:
|
• |
Create a selection in the image.
|
• |
Double-click a selection in the Selection Portfolio panel to add it to the
document window.
|
2 |
Choose Select menu |
Corel Painter converts the selection to a shape, giving it the default shape attributes. The new shape appears in the Layers panel. |
For best results, the selection should be path-based. If the selection is
pixel-based, from the menu bar choose Select |
Corel Painter lets you work with shapes that were created in Adobe Illustrator and saved to the AI format (version 3 or earlier).
Adobe Illustrator layers are supported in Corel Painter, but several Adobe Illustrator shape elements, such as patterns, placed images, gradients, masks, and text are not supported. If the file includes text, you must convert text to outlines when saving the file.
If both Corel Painter and Adobe Illustrator are running on your computer, you can copy content from Adobe Illustrator and paste it in Corel Painter.
| To acquire shapes from Adobe Illustrator |
1 |
Before acquiring the shape in Corel Painter, you need to ensure that the AI file was
saved as Adobe Illustrator version 3 or earlier.
|
2 |
In Corel Painter, choose File menu |
3 |
In the Adobe Illustrator File dialog box, select the Adobe Illustrator file, and click
Open.
|
| To convert text in Adobe Illustrator |
1 |
In Adobe Illustrator, select the text using a selection tool.
|
2 |
Choose Type menu |
When you apply a stroke, also known as an outline, to a shape, you can choose the color, opacity, and width of the path outlining the shape. You can also control the way line ends are drawn and joined. In addition, you can apply a fill to a shape by coloring the area enclosed by the stroke. When you fill a shape, you can choose the color and opacity of the fill.
Stroke and fill attributes apply to both open and closed shapes. Before filling an open shape, Corel Painter closes the shape by connecting the endpoints with a straight line.
The Flatness attribute controls how many straight lines the program uses to approximate a curve when printing. PostScript output devices create curved lines by linking a series of short, straight lines that progress in angle. The smaller the flatness setting, the greater the number of straight lines, and the more accurate the curve.
You can also change the default shape attributes. For more information, refer to Shapes Preferences. In addition, you can paint a shape after the shape has been committed to a pixel-based image layer.
| To set shape stroke attributes |
1 |
With the Shape Selection tool |
You can select multiple shapes by holding down Shift while clicking the shapes. |
2 |
In the Set Shape Attributes dialog box, enable the Stroke check box to apply an
outline to the selected shape.
|
To remove the stroke, disable the check box. |
3 |
Double-click the chip, choose a color from the Color dialog box, and click OK.
|
4 |
Adjust the Opacity and Width sliders to control the opacity and width of the
stroke.
|
5 |
Click one of the following Line Cap icons to control the endpoints of open shapes.
|
Choose Projecting |
6 |
Click one of the following Line Join icons to determine how corners are created
when two segments meet.
|
Choose Miter |
7 |
Adjust the Miter Limit slider.
|
When lines are joined at a sharp angle, a sharp corner is created. You can set the miter limit to smooth out the sharpness. |
8 |
Click Set New Shape Attributes.
|
![]()
When you select a shape with the Shape Selection tool, you can also specify
the following attributes by using the buttons on the property bar:
|
• |
Toggle Stroke Color |
• |
Select Stroke Color
|
• |
Toggle Fill Color |
• |
Select Fill Color
|
| To set shape fill attributes |
1 |
With the Shape Selection tool |
You can select multiple shapes by holding down Shift while clicking the shapes. |
2 |
In the Set Shape Attributes dialog box, enable the Fill check box to apply a stroke
to the selected shape.
|
To remove the fill, disable the check box. |
3 |
Double-click the chip, choose a color from the Color dialog box, and click OK.
|
4 |
Adjust the Opacity slider to control the opacity of the fill.
|
5 |
Click one of the following icons:
|
• |
Fill Overlaps |
• |
Don’t Fill Overlaps |
6 |
Click Set New Shape Attributes.
|
![]()
You can also specify some fill and fill color attributes on the property bar
when you select a shape with the Layer Adjuster |
You can also use the Edit menu |
| To set shape flatness |
1 |
With the Shape Selection tool |
You can select multiple shapes by holding down Shift while clicking the shapes. |
2 |
In the Set Shape Attributes dialog box, adjust the Flatness slider.
|
3 |
Click Set New Shape Attributes.
|
![]()
Usually, it is not necessary to change the flatness setting. You may want to
change it to adjust for a particular high resolution printer or to avoid a
PostScript limitcheck error. Check with your output service to find out if they
have a recommended flatness setting.
|
A change in flatness appears only in your output, not on your screen.
|
If you want to modify the default appearance of the shapes that you draw, you can modify the shape preferences. When you change a preference, the new preference is applied to all the new shapes that you draw. If you want to clearly distinguish a shape that’s in the process of being drawn from a shape whose paths are closed, you can specify preferences for each state. You can also modify the appearance of Bezier handles and various elements such as outlines and wings, to make it easier for drawing.
| To set preferences for drawing shapes |
1 |
Do one of the following:
|
• |
(Mac OS) Choose Corel Painter 12 |
• |
(Windows) Choose Edit |
2 |
Perform a task from the following table.
|
|
|
Copyright 2012 Corel Corporation. All rights reserved.