Quick links to procedures on this page:
• |
• |
• |
• |
• |
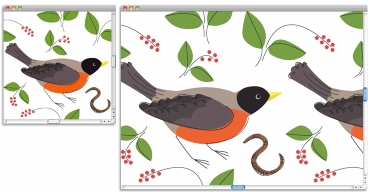
You can create a pattern from scratch or from an existing image. When creating a pattern from an exisitng image, you can base the pattern on the entire image or a selected area. You can also create a pattern from a mask, which produces a pattern with a transparent background. The image or selection that you choose is converted into a tile that, when repeated, generates a pattern.
A pattern tile was created by applying brushstrokes to the canvas.
If you want to edit an existing pattern, or if a pattern preview isn’t detailed enough, you can open the pattern tile in its own window so you can view the pattern closely to modify it. For example, you can manipulate a pattern to be a half-drop design, traditionally used in wallpaper designs.
After creating a pattern tile, you may want to refine it so that it tiles seamlessly. For more information, see Creating Seamless Patterns.
Images that you turn into patterns are saved in the RIFF format, and they maintain their pattern characteristics even after you save and reopen them. You can switch libraries whenever you want to use a different set of patterns. For more information, see Libraries.
| To create a pattern from scratch |
1 |
Choose File |
2 |
Type values in the Width and Height boxes.
|
If you want to create a pattern, you should set a small canvas size, such as 400 pixels by 300 pixels at 300 ppi. |
3 |
Choose Window |
4 |
In the Patterns panel, click the Pattern Options button |
5 |
Apply brushstrokes to the canvas.
|
If you apply a brushstroke to the edge of the canvas, wrap-around colors are enabled so that you can drag a brushstroke off one edge of an image, while simultaneously applying the brushstroke to the other side of the image. |
6 |
Click the Pattern Options button, and choose Add Image to Library.
|
7 |
In the Save Image dialog box, type a name for the pattern.
|
You can also create a pattern by choosing Edit |
| To create a pattern from an image |
1 |
Open the image file you want to use in creating a pattern.
|
2 |
Choose Window |
3 |
In the Pattern panel, click the Pattern Options button |
4 |
Click the Pattern Options button, and choose Add Image to Library.
|
5 |
In the Save Image dialog box, type a name for the pattern.
|
You can also create a pattern by choosing Edit |
| To create a pattern from a selection |
1 |
Open the image file you want to use in creating a pattern.
|
2 |
Choose Window |
3 |
Choose the Rectangular Selection tool |
4 |
Drag in the document window to select the area that you want to save as a pattern
tile.
|
5 |
In the Pattern panel, click the Pattern Options button |
6 |
In the Capture Pattern dialog box, enable one of the following options:
|
• |
Rectangular Tile — places the tile in a rectangular grid for fills. This option
disables the Bias slider.
|
• |
Horizontal Shift — offsets the tiles in subsequent rows
|
• |
Vertical Shift — offsets the tiles in subsequent columns
|
If applicable, adjust the Bias slider to control the amount of offset. |
7 |
Type a name in the Name text box.
|
8 |
Click OK to save the pattern tile to the current library.
|
You can also create a pattern that is based on a 4-point clone source, such as
perspective or bilinear. For more information, see Applying Transformations
When Sampling.
|
| To create a masked pattern |
1 |
Open the image file that you want to use in creating a pattern.
|
2 |
Choose Window |
3 |
Choose the Lasso tool |
4 |
Draw a freehand border around the area that you want to convert to a masked
pattern in the document window.
|
5 |
In the Pattern panel, click the Pattern Options button |
6 |
In the Capture Pattern dialog box, enable one of the Rectangular Tile option.
|
7 |
Type a name in the Name text box.
|
8 |
Click OK to save the masked pattern to the current library.
|
To quickly apply a pattern mask, click the Brush Selector. In the Brush
Library panel, choose the Pattern Pens category, and then choose the Pattern
Masked Pen variant.
|
You can apply pattern masks by using any brush variant that supports them.
For more information, see To paint with a pattern.
|
| To edit a pattern |
1 |
Choose Window |
2 |
Click the Pattern selector, and click a pattern in the Painter Patterns library panel.
|
3 |
Click the Pattern Options button |
Corel Painter opens the selected pattern tile in its own document window. |
4 |
On the canvas, modify the pattern tile image.
|
5 |
Click the Pattern Options button |
6 |
In the Save Image dialog box, click OK to save the pattern to the library.
|
If you want to rename the pattern, type a new name in the Save As text box. For example, you may want to modify a default pattern, but keep a copy of the default pattern intact. |
The Check Out Pattern mode supports wrap-around colors. When you drag a
brushstroke off one edge of an image, the brushstroke is simultaneously
applied to the other side of the image. This allows you to quickly modify the
edges of an individual pattern tile.
|
|
|
Copyright 2012 Corel Corporation. All rights reserved.