Quick links to procedures on this page:
• |
• |
• |
• |
• |
• |
• |
• |
Corel Painter allows you to sample part of an image and apply a transformation to the sample when you reuse it elsewhere. This technique is also referred to as multi-point cloning. You can apply transformations such as, scaling, rotating, shearing (also referred to as skewing), or you can apply perspective.
To apply transformations when sampling, you can select a multi-point cloning brush variant from the Cloners brush category or you can use any brush variant that supports the cloning method. For more information, see To transform a brush variant into a cloner brush.
The following table describes the available multi-point sampling brush variants.
After selecting a brush variant, you need to set the sample and destination reference points in the image. The number of reference points depends on the type of transformation that you choose. The reference points allow you to identify the sample area, position the destination, and control the transformation. After the points are set, you can then apply brushstrokes to the destination area to gradually reveal the transformed sample. You can insert source points in one document and destination points in another, or you can insert both sets of points in the same document.

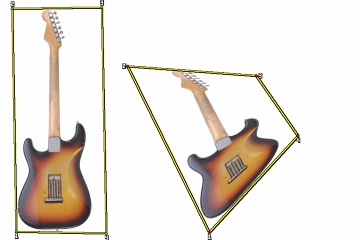
Sample source (left) and destination (right) reference points are set for Perspective cloning.
Tiling allows you to fill a space by repeating a small sampled image. The 4-Point Tiling option is available for Bilinear or Perspective cloning only.
The four sample reference points define the sampled area, which is temporarily converted into a pattern tile. In the clone destination, the tile is warped according to the relative positions of the source and destination reference points and repeated as necessary to cover the area. If you want to save the sampled area for future use, you can capture it as a pattern. For more information, see Creating and Editing Patterns.
With 4-Point Tiling, the source image is repeated.
Tiling is particularly useful when you want to fill an area with the sample source. For more information, see Filling an Area With a Sampled Image.
| To scale the sample source |
1 |
Click the Cloner tool |
2 |
Click the Brush Selector on the Brush Selector bar.
|
3 |
In the Brush Library panel, click the XScale 2P brush variant.
|
When you choose the XScale 2P brush variant, the Scale (2) clone type is automatically selected in the Cloning panel. |
4 |
Hold down Option (Mac OS) or Alt (Windows), click in the image to set the two
sample reference points.
|
5 |
Hold down Option + Shift (Mac OS) or Alt + Shift (Windows), and click to set
the two destination reference points.
|
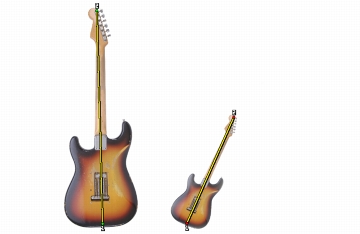
The relative distance between the two destination points and the two source points determines the amount of scaling that is applied to the sample. For example, if the line length between the two destination points is longer than the line length between the two source points, the sample is scaled up. Conversely, if the line length between the two destination points is shorter than the line length between the two source points, the sample is scaled down. |
6 |
Apply brushstrokes to the destination area.
|
You can disable offset sampling by clicking the Clone Color button in the Color panel or by clicking the Brush Selector on the Brush Selector bar, and choosing a non-Cloner brush variant. |
To achieve the best scaling results, set the sample reference points at the outer
edges of the object that you want to sample to better delineate its size. This
ensures that the object will be scaled proportionally.
|
| To rotate the sample source |
1 |
Click the Cloner tool |
2 |
Click the Brush Selector on the Brush Selector bar.
|
3 |
In the Brush Library panel, click the XRotate 2P brush variant.
|
When you choose the XRotate 2P brush variant, the Rotate (2) clone type is automatically selected in the Cloning panel. |
4 |
Hold down Option (Mac OS) or Alt (Windows), and set the two sample reference
points.
|
5 |
Hold down Option + Shift (Mac OS) or Alt + Shift (Windows), and click in the
image to set the two destination reference points.
|
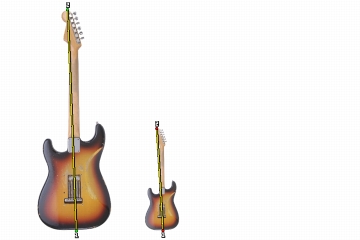
The relative difference between the angle of the line of the two destination points and the two sample reference points determines the angle of rotation of the sample. If the line angle does not change, the position of the destination points relative to the sample points also affects the rotation. For example, if you set the sample points vertically from bottom to top, but then set the destination points at the same vertical angle but from top to bottom, the sampled image will be flipped 180 degrees. |
6 |
Apply brushstrokes to the destination area.
|
You can disable offset sampling by clicking the Clone Color button in the Color panel or by clicking the Brush Selector on the Brush Selector bar, and choosing a non-Cloner brush variant. |
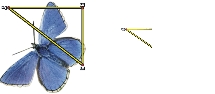
The line length does not affect the rotation.
|
| To rotate and mirror the sample source |
1 |
Click the Cloner tool |
2 |
Click the Brush Selector on the Brush Selector bar.
|
3 |
In the Brush Library panel, click the XRotate, Mirror 2P brush variant.
|
When you choose the XRotate, Mirror 2P, the XRotate & Mirror (2) clone type is automatically selected in the Cloning panel. |
4 |
Hold down Option (Mac OS) or Alt (Windows), and click in the image to set the
two sample reference points.
|
5 |
Hold down Option + Shift (Mac OS) or Alt + Shift (Windows), and click to set
the two destination reference points.
|
The relative difference between the angle of the line of the two destination points and the two sample points determines the angle of rotation of the mirrored clone image. |
If the line angle does not change, the position of the destination points relative to the sample points also affects the rotation. For example, if you set the sample points vertically from bottom to top, but then set the destination points at the same vertical angle but from top to bottom, the sampled image will be flipped 180 degrees. |
If you want to mirror the sample, without any rotation, set both the sample and destination points in the same position. |
6 |
Apply brushstrokes to the destination area.
|
You can disable offset sampling by clicking the Clone Color button in the Color panel or by clicking the Brush Selector on the Brush Selector bar, and choosing a non-Cloner brush variant. |
| To rotate and scale the sample source |
1 |
Click the Cloner tool |
2 |
Click the Brush Selector on the Brush Selector bar.
|
3 |
In the Brush Library panel, click the XRotate, Scale 2P brush variant.
|
When you choose the XRotate, Scale 2P brush variant, the XRotate & Scale (2) clone type is automatically selected in the Cloning panel. |
4 |
Hold down Option (Mac OS) or Alt (Windows), and set the sample reference
points.
|
5 |
Hold down Option + Shift (Mac OS) or Alt + Shift (Windows), and set the two
destination reference points.
|
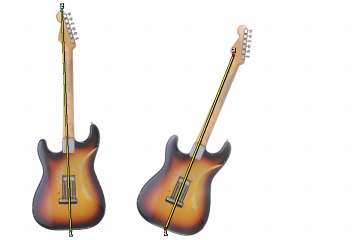
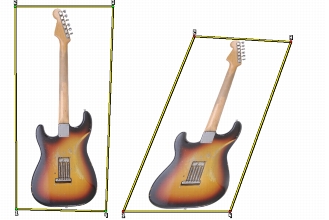
The relative distance between the two destination points and the two sample points determines the amount of scaling that is applied to the sample. In addition, the relative difference between of the angle of the line of the two destination points and the two sample reference points determines the angle of rotation of the mirrored sample image. In cases where the line angle does not change, the position of the destination points relative to the sample points also affects the rotation. |

Two destination reference points are set in preparation for Rotate & Scale sampling.
6 |
Apply brushstrokes to the destination area.
|
You can disable offset sampling by clicking the Clone Color button in the Color panel or by clicking the Brush Selector on the Brush Selector bar, and choosing a non-Cloner brush variant. |
| To rotate, scale, and shear the sample source |
1 |
Click the Cloner tool |
2 |
Click the Brush Selector on the Brush Selector bar.
|
3 |
In the Brush Library panel, click the XRotate, Scale, Shear 3P brush variant.
|
When you choose the XRotate, Scale, Shear 3P brush variant, the XRotate, Scale, Shear (3) clone type is automatically selected in the Cloning panel. |
4 |
Hold down Option (Mac OS) or Alt (Windows), and click in the image to set the
three sample reference points.
|
5 |
Hold down Option + Shift (Mac OS) or Alt + Shift (Windows), and click in the
image to set the three destination reference points.
|
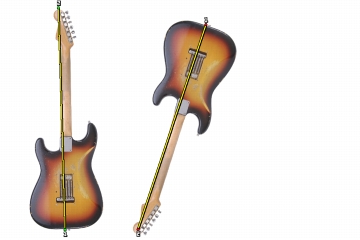
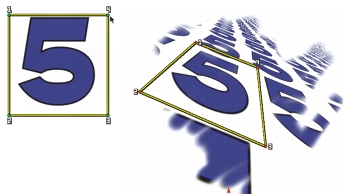
When all three points are inserted, a triangle is created. The length of the line segments controls the scaling of the sample, the angling of the line segments controls the rotation, and the degree of slanting controls the shearing, also referred to as skewing. |
Sample source–destination reference points are set for Rotate, Scale, & Shear.
6 |
Apply brushstrokes to the destination area.
|
You can disable offset sampling by clicking the Clone Color button in the Color panel or by clicking the Brush Selector on the Brush Selector bar, and choosing a non-Cloner brush variant. |
| To warp the sample source |
1 |
Click the Cloner tool |
2 |
Click the Brush Selector on the Brush Selector bar.
|
3 |
In the Brush Library panel, click the XBilenear 4P brush variant.
|
When you choose the XBilenear 4P brush variant, the XBilenear 4P clone type is automatically selected in the Cloning panel. |
4 |
Hold down Option (Mac OS) or Alt (Windows), and click to set the four sample
reference points.
|
5 |
Hold down Option + Shift (Mac OS) or Alt + Shift (Windows), and click to set
the four destination reference points.
|
The relative positions of all four sample and destination points affects the warping of the sample. |
6 |
Apply brushstrokes to the destination area.
|
You can disable offset sampling by clicking the Clone Color button in the Color panel or by clicking the Brush Selector on the Brush Selector bar, and choosing a non-Cloner brush variant. |
You can tile the sample by enabling the 4-Point Tiling check box in the
Cloning brush control panel.
|
| To add perspective to the clone source |
1 |
Click the Cloner tool |
2 |
Click the Brush Selector on the Brush Selector bar.
|
3 |
In the Brush Library panel, click the XPerspective 4P brush variant.
|
If you want the clone to produce a tiling effect, click the XPerspective Tiling 4P brush variant. |
When you choose the XPerspective 4P brush variant, the XPerspective 4P clone type is automatically selected in the Cloning panel. |
4 |
Hold down Option (Mac OS) or Alt (Windows), and click in the image to set the
four sample reference points.
|
5 |
Hold down Option + Shift (Mac OS) or Alt + Shift (Windows), and click to set
the four destination reference points.
|
The relative position of the four sample and destination points controls the perspective transformation. To achieve a simple perspective transformation, set the four sample points to form a rectangle, and then set the four destination points to form a trapeze. |
6 |
Apply brushstrokes to the destination area.
|
You can disable offset sampling by clicking the Clone Color button in the Color panel or by clicking the Brush Selector on the Brush Selector bar, and choosing a non-Cloner brush variant. |
| To move previously set reference points |
1 |
Do one of the following:
|
• |
Hold down Option (Mac OS) or Alt (Windows) to display the sample points.
|
• |
Hold down Option + Shift (Mac OS) or Alt + Shift (Windows) to display the
destination points.
|
2 |
With the reference points displayed, drag a point to a new location.
|
|
|
Copyright 2012 Corel Corporation. All rights reserved.