Quick links to procedures on this page:
• |
• |
• |
• |
• |
• |
The Hard Media controls let you modify Hard Media variants, which include blenders, pencils, chalks, Conté crayons, crayons, pastels, markers, and erasers. The controls let you build your own Hard Media toolkit with your own customized variants. For a complete list of the Hard Media variants, see Choosing a Hard Media Variant.
The Hard Media controls are usable only with the Circular, Captured, and Eraser dab types. For more information about dab types, see General Controls.
You can also save your customized Hard Media variant. For more information, see Adjusting Brushes.
You can modify Hard Media profiles to change the shape and size of the dabs that you apply to the canvas. By changing the profile, you can simulate the real-world hard media that have different shapes, sharpness, or thickness. Using the Hard Media controls, you can change the size, and choose one of six profiles to modify the shape.
When changing the shape, you can use the Squeeze controls to specify the vertical and horizontal ranges of the dab. For example, tilting the tool while drawing can change the dab shape from round to elliptical. You can also change the size of the tip.
| To choose a Hard Media tip profile |
1 |
With a Hard Media variant active, choose Window |
2 |
Click the Hard Media tip profile that you want to use.
|
| To set the Hard Media tip size |
1 |
With a Hard Media variant active, choose Window |
2 |
Move the Size slider to the right to increase the size of the tip, or move the slider to
the left to decrease the size of the tip.
|
| To set the Hard Media tip shape |
1 |
With a Hard Media variant active, choose Window |
2 |
In the Squeeze area, do any of the following:
|
• |
Move the V Min slider to the left to increase the amount of squeeze applied to
the dab on the vertical axis. This setting represents the dab at its smallest.
|
• |
Move the V Max slider to the left to increase the amount of squeeze applied to
the dab on the vertical axis. This setting represents the dab at its maximum size.
|
• |
Move the H Min slider to the left to increase the amount of squeeze applied to
the dab on the horizontal axis. This setting represents the dab at its smallest.
|
• |
Move the H Max slider to the left to increase the amount of squeeze applied to
the dab on the horizontal axis. This setting represents the dab at its maximum
size.
|
Corel Painter lets you control how a Hard Media variant behaves when you apply strokes to the canvas. The Stepping slider controls the transition between narrow and wide sections of a stroke. Moving the slider to the right makes the transition appear more abrupt, and moving it to the left makes the transition smoother.
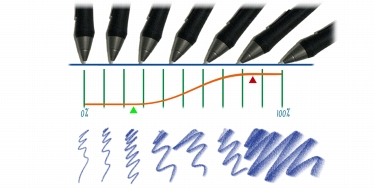
The Transition Range sliders lets you determine the angle at which you transition from a fine point to a wider stroke when tilting your stylus. This control lets you simulate the look and feel of hard media such as pencils or markers. A real-world example of this would be holding a sharp pencil perpendicular to a piece of paper. When you draw at a 90° angle, you produce a very narrow or hard line. If you tilt your pencil to a 60° angle, you produce a wider or softer line.

At the top of the image, a stylus is shown tilting at different angles and the stoke that corresponds with the angle is displayed at the bottom of the image. The graph in the middle of the image identifies the start (green arrow) and the Finish (red arrow) of the Transition Range.
| To set the Hard Media size step |
1 |
With a Hard Media variant active, choose Window |
2 |
Move the Size Step slider to the right to produce fewer angles between dabs, or
move it to the left to create more angles between dabs.
|
| To set the Hard Media transition range |
1 |
With a Hard Media variant active, choose Window |
2 |
Move the Start slider to set the angle at which the transition will start.
|
Moving the slider to the right increases the angle; moving the slider to the left decreases the angle. |
3 |
Move the Finish slider to set the angle at which the transition will finish.
|
Moving the slider to the right increases the angle; moving the slider to the left decreases the angle. |
As you modify the Hard Media variants, you can preview your changes to see how they affect the dab shape and size in the Dab profile panel. You can toggle between different views of the dab, including the Hard Media view. For more information about these views, see Dab Profile.
| To choose a brush dab preview option |
1 |
Choose Window |
2 |
In the Dab Profile panel, click the Brush Dab Preview Window until the desired
preview appears.
|
|
|
Copyright 2012 Corel Corporation. All rights reserved.