Quick links to procedures on this page:
• |
• |
• |
• |
• |
• |
• |
• |
You can paint on layers. You can also move layer content to change the overall image layout. Using selections, you can turn an area of a layer into a floating object so that you can move it separately. Reference layers, low-resolution representations of an image, let you quickly manipulate images in ways that might otherwise require more time.
When a layer is selected, you can use the brushes to paint, draw, erase, or clone. When painting on layers, keep the following points in mind:
• |
You can’t paint across grouped layers — you must collapse the group first. For
more information, see To collapse a group.
|
• |
You can protect areas of a layer from painting by creating a selection. For more
information, see Creating Selections.
|
| To paint on a layer |
1 |
In the Layers panel, select a layer.
|
2 |
Click the Brush Selector on the Brush Selector bar.
|
3 |
In the Brush Library panel, click a brush category and brush variant.
|
4 |
Paint on the layer in the document window.
|
You can make a selection on a layer using the Rectangular Selection, Oval Selection, Lasso, or Magic Wand tool. Selections on layers function in the same way as selections on the canvas — you can use them to constrain brushstrokes, to isolate an area of the layer for applying an effect, or to choose an area of the layer to cut or copy. For more information, see Selections and Transformations.
By default, when you move a selection, only the selection marquee moves, not the images. To move selected images on a layer, you must “float” the selection. In effect, this turns the selected area of the layer into a floating object. You can move floating objects around a layer to create new compositions.
Each layer in a document can have only one floating object at a time. You can drop a floating object to merge it with the layer. Many operations automatically drop (or merge) the floating object back to its parent layer.
Floating objects are created by making a selection on a pixel-based layer.
When you save a document to RIFF format, Corel Painter preserves all floating objects. However, saving a document in a non-RIFF format automatically drops floating objects onto their parent layers.
| To create a floating object |
1 |
Create a selection on a layer using a selection tool.
|
2 |
Do one of the following:
|
• |
Click the selection with the Layer Adjuster tool |
• |
Choose Select |
The floating object appears as an item below the parent layer in the Layers panel. |
| To reposition or drop a floating object |
1 |
In the Layers panel, select the floating object.
|
2 |
Perform an action from the following table.
|
Reference layers get their image content from an external source — either a pixel-based layer in the current document or a separate file. They provide a low-resolution representation of the original image that you can quickly manipulate in ways that would otherwise require more time. Working with a reference layer allows you to resize, rotate, or slant a layer onscreen by dragging its handles. The changes are immediately displayed in the document window. When you finish making changes, you can commit the reference layer back to a standard layer. Corel Painter examines the source image to restore the original resolution.
You cannot edit the image data in a reference layer. If you try to paint on or apply effects to a reference layer, Corel Painter prompts you to commit it back to a pixel-based layer.
You can create a reference layer by basing it on an existing layer or by placing an image. For more information about placing images, see Opening and Placing Files.
| To create a reference layer |
1 |
Select a layer.
|
2 |
Choose Layer |
The layer’s icon in the Layers panel changes to an eight-handled shape |
| To modify a reference layer |
• |
Select a reference layer.
|
| To commit a reference layer |
• |
In the Layers panel, right-click a reference layer, and click Commit.
|
The conversion process might take a few seconds, depending on the size and quality of the layer. |
You can adjust a layer’s opacity to create different levels of transparency. The Opacity slider covers a range of 0% (completely transparent) to 100% (completely opaque).
| To change a layer’s opacity |
1 |
Select the layer you want to change.
|
2 |
In the Layers panel, do one of the following:
|
• |
Move the Opacity slider |
• |
Type a percentage in the Opacity box, and press Return (Mac OS) or Enter
(Windows).
|
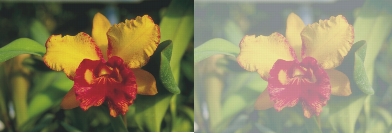
The example on the left shows the background layers at 100% opacity. The example on the right shows them at 50% opacity.
In the Layer Attributes dialog box, you can attach additional information to a layer by adding notes to it.
| To record notes for a layer |
1 |
Select a layer or group.
|
2 |
Do one of the following:
|
• |
Choose Layers |
• |
Click the Layer Options button |
3 |
Type in the Note box.
|
You can also record notes for pixel-based layers and reference layers, by
double-clicking the item in the Layers panel, or selecting an item and pressing
Return (Mac OS) or Enter (Windows).
|
| Some features described in the Help are available only in Corel Painter 12, and are not included in Painter Lite. Visit www.corel.com/painter for more information about Corel Painter 12. |
Copyright 2012 Corel Corporation. All rights reserved.