If you want to dive into Corel VideoStudio Pro right away, this tutorial will walk you through the key tasks. In this tutorial, you’ll learn how to:
The same basic steps can be applied to create a photo slideshow or any multimedia presentation that includes photos, video clips, and music.
For a quick movie, try the FastFlick. For more information, see FastFlick.
For more details about starting movie projects, see Project basics.
Let’s start with the most common situation—the shoot is done and you’ve transferred your video clips and photos from your camera to your computer. We can open Corel VideoStudio Pro, and jump directly to the Edit workspace and the Library.
The Library is the source for all your media, including video clips, photos, and music. It also houses templates, transitions, effects, and a variety of other media assets that you can use in your projects.

|
1
|
Click the Edit tab  at the top of the application window to open the Edit workspace. The Library panel appears in the upper right corner of the application. at the top of the application window to open the Edit workspace. The Library panel appears in the upper right corner of the application. |
|
4
|
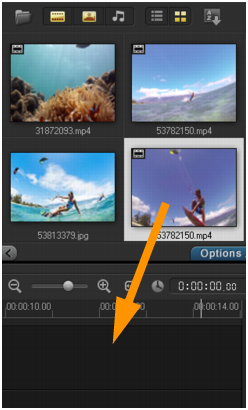
At the top of the Library, click the Import Media Files button  , select the video clips and photos that you want to use, and click Open. , select the video clips and photos that you want to use, and click Open. |
Note that the buttons at the top of the Library can be enabled and disabled to filter the thumbnails by video, photos, and music. If you don’t see the media you expect to see, check the state of these media buttons.

Adding clips and photos to a video project is as easy as dragging thumbnails for the video clips and photos that you want to use from the Library to the Timeline.
If you’re looking for a way to get polished results quickly, you can use an Instant Project template. For more information, see Using Instant Project templates.
The key to a successful video is to keep it short enough to hold your viewer’s interest. Let’s review and trim the video clips.
|
1
|
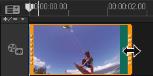
In the Edit workspace, click a video clip in the Timeline. |

|
3
|
After you review the clip, drag the orange Trim Marker from the original starting position to the new starting position. The Scrubber moves to the selected frame and this frame displays in the Preview Window. |

1. Trim Marker (one on each end). 2. Scrubber.
You can also trim video clips in the Timeline itself by dragging the end handles of a clip.
Want to edit a section in the middle? Try Multi-Trim Video. For more information, see Trimming video into multiple clips.
Now let’s add a title.
|
1
|
Drag the Scrubber to the position you want. |
|
2
|
Click the Title button  to the left of the Library thumbnails. to the left of the Library thumbnails. |
|
3
|
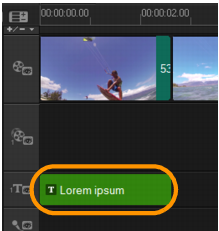
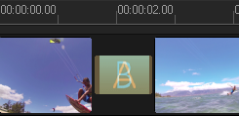
You can type directly in the Preview Window, but the easiest way to get a professional-looking title, is to drag one of the title thumbnails from the Library to the Title track in the Timeline. |
|
6
|
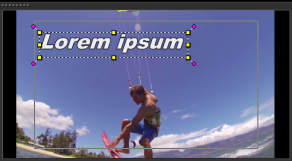
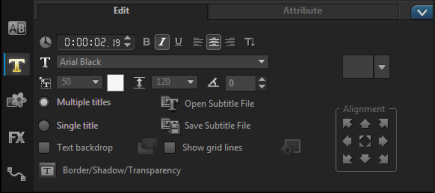
The Options panel for titles displays below the thumbnails in the Library. Use any of the controls to format your title text. For example, you can align the text and change the font, size, and color. |
You can add transitions between clips or between photos. Transitions can be used to fade in or fade out or to dissolve one photo into the next. There are many transition options to choose from.
|
1
|
In the Library, click the Transition button  . . |
|
2
|
Click the Gallery drop-list at the top of the Library, and choose All if you want to see what is available. |
If you want to apply the same transition between all clips and photos in the track, in the Library, right-click the transition thumbnail, and choose Apply current effect to video track. You will be warned about replacing any existing transitions.
You can add songs from your computer by dragging a music file from the Library to the Music track. You can also use Auto Music to choose royalty-free music to your project.

|
1
|
On the Timeline toolbar, click the Auto Music button  . . |
|
2
|
In the Auto Music area that displays below the Library thumbnails, experiment with different choices in the drop-lists and click Play selected Music to listen to the selection. |
|
4
|
The music is added to the Music track, and as with other clips, you can drag it to a new position in the Timeline and trim it by dragging the end handles. |
Note that with any audio clips, or video clips that include sound, you can control the volume of the clips. For more information about adjusting audio, see Audio.
When you’re finished with your project, you can save it and share it in a variety of ways. For this tutorial, we’ll upload it directly to the Web.
Before sharing, it’s important to save a version of your project to the native *.vsp format. This will give you maximum flexibility if you choose to edit your project later or if you want to output it to a different format.
|
1
|
Click the Share tab  to view the Share workspace. to view the Share workspace. |
|
2
|
Click File > Save, choose a location from the Save in box, and type a name in the File name box. |
|
3
|
To share your video on the Web, click the Web button  , then click YouTube, Facebook, Flickr, or Vimeo, and click Log In to sign in to your account or to create an account. After you sign in and approve the link between Corel VideoStudio Pro and the account, choose the settings you want for your video upload and click Start. , then click YouTube, Facebook, Flickr, or Vimeo, and click Log In to sign in to your account or to create an account. After you sign in and approve the link between Corel VideoStudio Pro and the account, choose the settings you want for your video upload and click Start. |
Copyright 2014 Corel Corporation. All rights reserved. Legal Notice