Work with special effects
Corel PHOTO-PAINT special effects let you change the appearance of an image. You can apply an effect to the entire image or object, or you can use a mask or a lens to transform only part of an image.


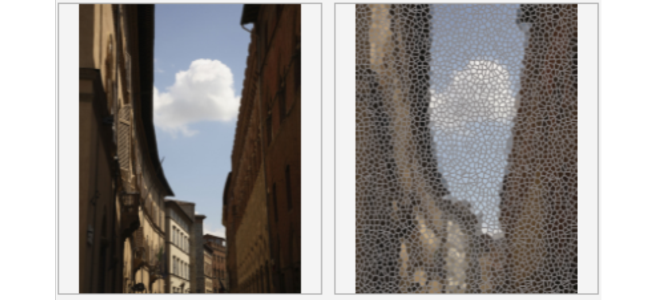
Examples of effects applied to an image. Top (left to right) Original image, Emboss effect, Cubist artistic effect, Mosaic creative effect, Pixelate distort effect; bottom (left to right) Add noise effect, Zoom blur effect, Solarize color transform effect, Edge detect contour effect, Sharpen effect
Effects are organized into the following categories.
|
Lets you create the illusion of depth. Effects include 3-D rotate, Bevel effect, Cylinder, Emboss, Glass, Page curl, Pinch/punch, Sphere, The Boss, and Zig zag.
|
|
|
Lets you apply hand-painted techniques. Effects include Charcoal, Conte crayon, Crayon, Cubist, Dabble, Impressionist, Palette knife, Pastels, Pen and ink, Pointillist, Scraperboard, Sketch pad, Watercolor, Water marker, and Wave paper.
|
|
|
Lets you blur an image to simulate movement, speckling, or gradual change. Effects include Tune blur, Directional smooth, Feather, Gaussian blur, Jaggy despeckle, Low pass, Motion blur, Radial blur, Smart blur, Bokeh blur, Smooth, Soften, and Zoom.
|
|
|
Lets you simulate effects produced by various camera lenses. Effects include Colorize, Diffuse, Photo filter, Lens flare, Lighting effects, Sepia toning, Spot filter, and Time machine, which lets you walk your image back through history to recreate some popular photographic styles from the past.
|
|
|
Lets you create photographic illusions by using color reduction and replacements. Effects include Bit planes, Halftone, Psychedelic, and Solarize.
|
|
|
Lets you highlight and enhance the edges of an image. Effects include Edge detect, Find edges, Trace contour, and Local Equalization.
|
|
|
Lets you remove small imperfections and sharpen images. Effects include "Dust and Scratch" on page 34 and "Tune Sharpen" on page 34.
|
|
|
Lets you apply various textures and shapes to an image. Effects include Art Style, Crystalize, Fabric, Frame, Glass block, Mosaic, Scatter, Smoked glass, Stained glass, Vignette, and Vortex.
|
|
|
Lets you apply a wide range of effects to your image. For example, you can add texture and patterns to an image (Bump-map effect). Effects include Band pass, Bump map, and User defined.
|
|
|
Lets you modify the graininess of an image. Effects include Tune noise, Add noise, 3-D stereo noise, Maximum, Median, Minimum, Remove Moire, and Remove Noise.
|
|
|
Lets you add a sharpening effect to focus on and enhance edges. Effects include Adaptive unsharp, Directional sharpen, High pass, Sharpen, and Unsharp mask.
|
|
|
Lets you add texture to an image by simulating a variety of surfaces, such as cobblestone, elephant skin, plastic, and relief sculpture. Effects include Brick wall, Bubbles, Canvas, Cobblestone, Elephant skin, Etching, Plastic, Plaster wall, Relief sculpture, Screen door, Stone, and Underpainting.
|
|
|
Lets you transform the color and tone of an image. Effects include Deinterlace, Invert Colors, Posterize, and Threshold.
|
|
Some effects support only RGB images. If an image is in a color mode that is not supported, the application converts the image to the RGB (24-bit) mode.
To browse the effects that are available in the application, see Special effects categories.
Corel PHOTO-PAINT lets you apply effects non-destructively. When you apply an effect non-destructively, the original image is not affected; Corel PHOTO-PAINT saves the changes separately, so you can edit, remove, show or hide them, and revert to the original object or image at any point. You can apply non-destructive effects from the Effects docker (Window ![]() Dockers
Dockers ![]() Effects), or the Add Effect button
Effects), or the Add Effect button ![]() in the Objects docker (Window
in the Objects docker (Window ![]() Dockers
Dockers ![]() Objects).
Objects).
Before you apply an effect, you can customize it. For example, when you use a vignette effect to frame an image, you can increase the offset value and decrease the fade value to decrease the size and opacity of the frame. With a watercolor effect, you can decrease the size of the brush to show more image detail or increase the size of the brush for an abstract effect.
All effects dialog boxes have a preview window that allows you to preview your designs in real-time as you adjust the special effect settings. You can pan to a new area, zoom in or out, and choose how to display the artwork in the preview window, so you can evaluate the adjustments you make. By default, the application also shows a live preview of the image in the drawing window as you modify the effect settings.
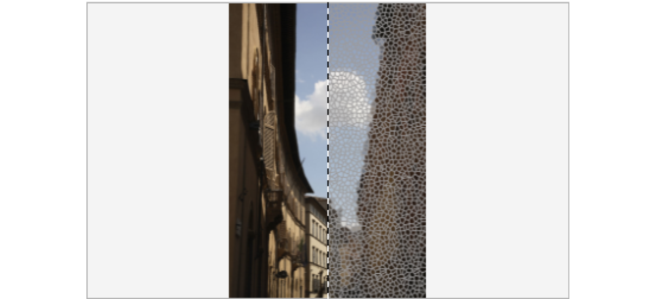
The before and after full (top) and split (bottom) previews are particularly useful to keep track of edits and understand how different settings affect the image.
The Effects docker is the hub for non-destructive editing, allowing for quick adjustments and unlimited experimentation. You can show and hide effects, edit applied effects, and apply multiple special effects to the same object. Plus, you can change the order of the applied special effects, and you can delete a special effect. Effects are cumulative; each time you apply an effect, it’s stacked on top of the previous effect. In the Effects docker, the effects appear in the order in which you apply them, with the most recently added effect at the top of the list. You can change the area to which an effect is applied by creating a mask and applying the adjustment to the newly defined editable area. In addition, you can create a mask from the areas affected by an effect so that you can re-use it when applying other effects. You can also flatten effects to apply changes permanently.
Applying special effects to an image area
You can apply a special effect to part of an image by defining an editable area. For information about editable areas, see Masks.
You can also use a lens to apply a special effect to part of an image. When you use a lens, changes are not applied to the image; instead, they are seen on the screen through the lens. Most special effects are also available as lenses. Applying a non-destructive effect to an object affects only the appearance of the selected object, whereas applying an effect to a lens affects the appearance of all objects beneath the lens. For information about lenses, see Create lenses.
Repeating and fading special effects
After you apply an effect destructively, you can repeat it to intensify its result or fade it to diminish its intensity. For more information about repeating and fading actions, see Undo, redo, repeat, and fade actions.
With non-destructive editing, you cannot apply the same effect twice to an object.
You can define how an effect is merged with the image. For information about merge modes, see Merge modes.
Tracking, recording, and automating special-effects operations
Corel PHOTO-PAINT lets you track, record, and automate special-effects operations. For more information, see Use macros and scripts to automate tasks.
To apply an effect destructively
By default, as you modify the effect settings, the application shows a representation of the adjusted image in the image window. To disable the live preview, disable the Preview check box.
Some special effects can affect the shape of the object they are applied to. You can retain an outline of the object’s original shape by enabling the Lock transparency button ![]() on the Objects docker. The areas that remain between the outline of the original shape and the new shape of the object are filled with black. If the Objects docker is not open, click Window
on the Objects docker. The areas that remain between the outline of the original shape and the new shape of the object are filled with black. If the Objects docker is not open, click Window ![]() Dockers
Dockers ![]() Objects.
Objects.
To apply an effect non-destructively
You cannot apply the same non-destructive effect twice to an object.
When you add a non-destructive effect, the Show/Hide Effects icon ![]() appears beside the object name in the Objects docker.
appears beside the object name in the Objects docker.
You can also apply an effect non-destructively by clicking the Add Effect button ![]() in the Objects docker (Window
in the Objects docker (Window ![]() Dockers
Dockers ![]() Objects), choosing an effect category, and clicking an effect.
Objects), choosing an effect category, and clicking an effect.
By default, as you modify the effect settings, the application shows a representation of the adjusted image in the image window. To disable the live preview, disable the Preview check box.
Some special effects can affect the shape of the object they are applied to. You can retain an outline of the object’s original shape by enabling the Lock object transparency button ![]() on the Objects docker. The areas that remain between the outline of the original shape and the new shape of the object are filled with black. If the Objects docker is not open, click Window
on the Objects docker. The areas that remain between the outline of the original shape and the new shape of the object are filled with black. If the Objects docker is not open, click Window ![]() Dockers
Dockers ![]() Objects.
Objects.
To preview your design while adjusting the effect settings
To work with non-destructive effects
Clicking the Show/Hide icon ![]() in the Effects docker changes the visibility of individual effects, whereas clicking the Show/Hide Effects icon
in the Effects docker changes the visibility of individual effects, whereas clicking the Show/Hide Effects icon ![]() in the Objects docker changes the visibility of all effects applied to an object and overrides the visibility settings for individual effects that you may have set in the Effects docker.
in the Objects docker changes the visibility of all effects applied to an object and overrides the visibility settings for individual effects that you may have set in the Effects docker.
You can also show or hide an effect by enabling or disabling the Show effect check box to the right of the Options button ![]() .
.
You can also hide and show effects by clicking the Show/Hide Effects toggle icon ![]() in the Objects docker (Window
in the Objects docker (Window ![]() Dockers
Dockers ![]() Objects). To hide or show the effects of multiple objects, select the objects, and click the Show/Hide Effects toggle icon
Objects). To hide or show the effects of multiple objects, select the objects, and click the Show/Hide Effects toggle icon ![]() . You can hide and show the effects for locked objects.
. You can hide and show the effects for locked objects.