Quick links to procedures on this page:
• |
• |
• |
Corel Painter lets you clone an image to create a work of art. In other words, you can use cloning techniques to give your digital photographs a second life.
This section explains the manual process of cloning an image. The manual process involves choosing the image, creating the clone, and then setting up the workspace to start painting in the clone. However, if you prefer, you can choose an image and let Corel Painter automatically set up the workspace for painting in the clone. For information, see Using Quick Clone.
To begin the cloning process, you need to select the image that you want to clone. Corel Painter then duplicates the source image and embeds the image as a clone source in the clone document. The clone document appears in a new document window, and the clone source is displayed in the Clone Source panel.
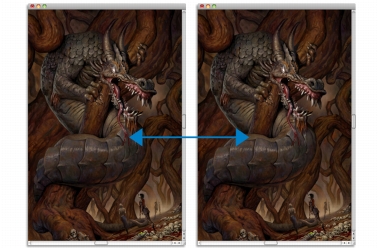
The clone source is best described as a snapshot of a selected image at a given time. Once the clone is created and the clone source is embedded, the relationship with the source image is broken. Therefore, if you make changes to the source image, the changes are not reflected in the clone source. The source image that you used as the clone source remains open in a document window, but it’s only for you to use as a reference. You can modify the source file, but if you want the changes to be reflected in the clone, you will need to update the clone source.
A snapshot of the source image (left) is embedded as a clone source in the clone document (right).
Once the initial clone is created, you can add additional clone sources to the clone document, which allows you to clone colors from different sources. For more information, see Working with Multiple Clone Sources.
When the clone document opens in the document window, you need to clear the canvas to begin painting in the clone by using the painterly technique of your choice. For more information, see Painting in the Clone.
Before you begin painting in the clone, you can also enable tracing paper. Tracing paper displays a faded-out version of the source image beneath the clone document, which lets you precisely apply clone colors to the canvas.
Unlike traditional tracing paper, the Corel Painter tracing paper is a viewing mode that you can use as a reference for painting or tracing images. It’s not a real object, such as a layer or a document. This viewing mode provides a faded-out version of the source image in the document window, as if it were displayed on top of a light box. When you apply media to the image with tracing paper enabled, the media is applied to the clone document, not the tracing paper.
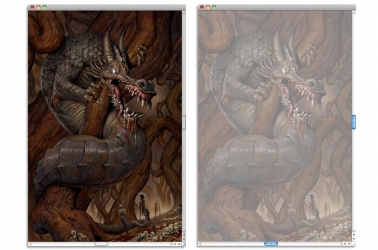
The clone with the tracing paper turned on (right) allows you to see a faded-out image of the clone source image (left).
When the tracing paper is turned on, not all image details are clearly visible. To keep track of the changes, you may want to toggle between enabling and disabling the tracing paper. You can also control the opacity of the tracing paper.
In addition to painting in a clone, you can use a clone with tracing paper enabled to outline an image. You can then use the outline as a starting point for a painting.
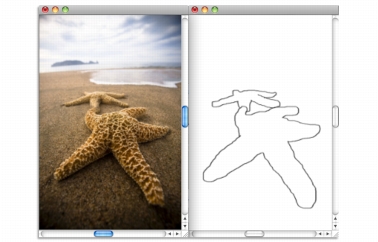
Use the Tracing Paper feature to view the image source for outlining (left). When you turn Tracing Paper off, you can see the outline (right).
| To clone an image |
1 |
Open the image that you want to clone.
|
2 |
Choose File |
The clone is displayed in its own document window. |
If you want to paint in the clone colors on a blank canvas, you can clear the clone document by choosing Select |
3 |
Apply brushstrokes to the canvas by using a cloner brush, or choose any brush and
set it to clone color.
|
If you want to open the Clone Source panel, choose Window |
When you create a clone, the source file is automatically embedded in the
clone document. Consequently, if you make changes to the source image, the
changes are not reflected in the clone. If you want to use the most up-to-date
version of the image, you need to add it as a new clone source and then delete
the older version. For more information, see To update a clone source.
|
If a source image has layers, cloning creates a fully composited copy — that is,
all layers in the image are dropped automatically. This aspect of cloning lets
you flatten an image for faster printing.
|
If you select a Cloner brush and switch to offset sampling while cloning an
image, the Offset Sampling check box is automatically enabled in the Clone
Source Panel. It is also important to note the the sampling reference point is
not treated as a clone source and does not display in the Clone Source panel.
For more information, see Performing Offset Sampling.
|
| To enable tracing paper |
1 |
Choose Window |
2 |
In the Clone Source panel, click the Toggle Tracing Paper button |
To use a keyboard shortcut, press Command + T (Mac OS) or Ctrl+ T (Windows). |
A faint rendering of the source image is displayed through the tracing paper. |
3 |
Do one of the following:
|
• |
Apply brushstrokes to the canvas by using a clone tool or brush variant set to
clone color.
|
• |
Outline the image using, for example, a Pencil brush variant.
|
You can also enable tracing paper from the Navigator panel by clicking the
Open Navigator Settings button |
| To update a clone source |
1 |
Choose Window |
2 |
In the Clone Source panel, click the Open Image button |
3 |
In the Clone Source panel, choose the older version of the clone source from the list.
|
4 |
Click the Delete button |
|
|
Copyright 2012 Corel Corporation. All rights reserved.