Quick links to procedures on this page:
• |
Corel Painter lets you create animation as well as modify QuickTime or AVI movies. It also offers you a range of options for critical elements of your animation, such as color, frame rate, and file size.
Corel Painter offers several methods to create original animations:
• |
Cloning or tracing video. For more information, refer to Cloning a Movie.
|
• |
Manipulating layers
|
• |
Drawing each frame by hand
|
Corel Painter has powerful features that simplify animation and help you get the best quality possible. You can use the Natural-Media tools in Corel Painter to create your own animations with a traditional look. Onion skinning allows you to see multiple frames at the same time. You can view up to five frames at a time: the current frame and four other frames adjacent to it. This will help you determine where the next frame of motion should be drawn. You can play back your animation over and over as you create it, to be sure you have the correct flow of movement.
Corel Painter offers certain ways of working with video that are not offered by QuickTime or Audio Video Interleaved (AVI) applications. You can use any of the Corel Painter brushes, textures, and effects to modify a QuickTime or AVI movie. You can paint directly into video frames, you can clone video using the Natural-Media tools, and you can combine or composite portions of one video clip with another.
When you open a QuickTime or AVI movie, Corel Painter automatically converts it to a frame stack. A frame stack is a series of images, each equal in size and resolution.
Corel Painter does not provide features for working with audio.
When you’re finished with the movie in Corel Painter, you can save it as a QuickTime, AVI, or animated GIF file. You can then open the QuickTime or AVI movie in a video-editing application, like Adobe Premiere, in which you can add sound effects and other finishing touches.
You might want to create a color set for the animation. Creating a color set helps you better control the use of color. For example, you wouldn’t want the colors of your characters shifting between frames. Using a particular color set prevents this from happening. You might want to set up an image of each character with annotations to specify which colors to use in which areas.
Not all colors are suitable for video. For more information about using color, refer to Using the Color Panel.
Frame rate describes the number of image frames displayed per second (fps). The frame rate can determine not only how big a file your animation is, but also how smooth the motion appears.
When you save a movie as an AVI file, you can specify the rate of display. This doesn’t necessarily mean that what you specify is what you’ll experience. Factors like frame size, compression method, and computer speed can prevent some movies from achieving their set rate. If your animations will be viewed on the computer only, frame rates of 8, 10, and 12 fps are good choices. If your animations will be viewed elsewhere, you should consider the following frame rates:
• |
The frame rate of film is 24 fps.
|
• |
The frame rate of National Television System Committee (NTSC) video is 30 fps
(29.97 fps in broadcast video). NTSC is the video standard used in the United
States.
|
• |
The frame rate of Phase Alternating Line (PAL) video is 25 fps.
|
These frame rates are sufficient to produce smooth, continuous motion with filmed or video-recorded subjects.
Animation drawings contain far less detail than live-action images. The difference in the level of detail allows animations to be produced at frame rates significantly lower than those designed for live action. Because of the smoothness of color fills and continuity between images, animations can look quite nice at rates between 10 and 15 fps.
You must consider frame rates to know how many drawings are needed to make actions smooth, natural, and consistent throughout the project.
The computer can display frames at any reasonable rate. The Frame Stacks panel provides control over frame display rates. You can preview an animation at a rate of 1 to 40 fps.
You can’t display different sections of a movie at different rates. What you can do is create sections separately at different rates and then modulate them to the same rate before joining them. This is the kind of work you’ll do in your video-editing application.
For more information, see To set the preview frame rate.
Keep in mind that video and animation can produce huge files. When planning a project, be careful not to overestimate your available disk space. For an idea of disk requirements, consider this example: Each 640 by 480-pixel, 24-bit color frame is 1.2 MB. At this size, a 12-fps, 30-second animation would consume more than 400 MB of disk space.
| To calculate the disk space required for a frame stack |
1 |
Using pixels as the unit of measurement for width and height, calculate the
number of bytes required to save the frame stack with the following formula:
|
(Frame Width) × (Frame Height) × (Bytes per Pixel) × (Number of Frames) |
2 |
Divide the product of the formula in step 1 by 1,024 to convert to kilobytes.
|
![]()
Bytes per pixel is determined by the storage type. For example, 24-bit color
with an 8-bit alpha channel uses 4 bytes per pixel. For more information
about storage types, refer to Creating a Movie.
|
When you save a movie as QuickTime or AVI, the file size can be reduced by
compression. For more information on compression, refer to Saving and
Exporting Movies.
|
In Corel Painter, digital video and animation files are known as movies or frame stacks. Whether you’re working with imported video or building a new animation, the tools are the same. They’re found in the Frame Stacks panel and in the Movie menu.
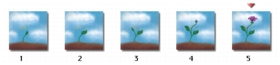
The number of frames displayed in the Frame Stacks panel is determined by the number of onion skin layers. A red triangle appears above the current frame.
The frame stack format is a series of images, each equal in size and resolution. The Frame Stacks panel appears whenever you open or create a movie file. The Frame Stacks panel must stay open while you work with a movie.
You work in one frame at a time — the one appearing in the document window. The Frame Stacks panel helps you navigate the frames in the stack and choose which frame to modify.
Each frame in a frame stack can have one layer. For example, if you add an item from the image portfolio onto a frame, Corel Painter places the image on a layer. You can move the image around using the Layer Adjuster tool. However, when you move between frames or close the file, Corel Painter drops all layers — the layer is deleted, and the layer’s content is flattened onto the background canvas. Refer to Layers for more information about working with layers.
The Frame Stacks panel displays thumbnails of several frames. The frame numbers appear under the thumbnails. The current frame is shown with a red triangle over it.
The number of thumbnails is determined by the layers of onion skin you’ve chosen. By default, QuickTime and AVI files are opened with two layers of onion skin. For more information on onion skinning, refer to Understanding Onion Skinning.
|
|
Copyright 2012 Corel Corporation. All rights reserved.