Quick links to procedures on this page:
• |
• |
• |
• |
• |
• |
• |
• |
• |
• |
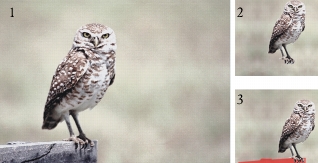
Rotoscoping is the process of painting on a movie, applying effects to a movie, or compositing a portion of the images from one movie with the images of another. This is often done to make the action of a person filmed in one place appear on a background filmed in another. You can also use rotoscoping to remove an element from a video clip, as shown below in the frames from a short movie of an owl on a roost. After the video was captured digitally, it was imported it into Corel Painter, and the roost was removed frame by frame, using the masking tools.
(1) The frame shows an owl perched on a roost. (2) The frame shows the owl without the roost. (3) The frame shows the mask used to hide the roost.
Rotoscoping is also useful for adding a background to an animation. The process is the same whether you work with digitized video or painted animation cells.
You can paint on, or apply effects to, any frame in a movie. You can do anything in a frame that you can do in a single image: paint with a brush, add layers, or apply an effect to a selection or to the entire image. Frames are automatically saved when you select another frame, and the changes cannot be undone.
| To paint on or apply an effect to a single frame |
1 |
In the Frame Stacks panel, go to the frame you want to work in.
|
To go to a frame, you can click on the thumbnail of the frame or click the Step Forward button |
2 |
Modify the image in the document window.
|
3 |
When you’re ready to work on the next frame, click the Step Forward button.
|
Changing frames automatically saves the frame. You cannot undo changes after the frame is saved. |
The Script feature lets you repeat the same actions for each frame in a movie. For example, you might want to apply an effect like Glass Distortion to a video clip. You can record a script that applies the Glass Distortion effect to a single image and then, with a single command, apply that script to the entire movie. A script can contain almost any action — a single command, a series of commands, or the many steps in creating an original drawing. You’ll devise scripts based on the needs of your project.
You cannot undo changes after applying a script to a movie. Before applying a script to a movie, you should become familiar with scripting and experiment with a separate sample image. You might want to work with a copy of the movie, or you might apply the script to a short sample movie to test it. For complete information on working with scripts, refer to Scripting.
You might use a script to apply a surface texture (paper grain) to an entire movie. In this case, you have several options for the position of the grain in each frame. You can put the grain in exactly the same position, move the grain randomly, or move it linearly by a set number of pixels. For instructions on applying surface texture and dye concentration, refer to Applying Effects.
You can apply a recorded brushstroke to a movie. Corel Painter divides the stroke into as many segments as there are frames and places the segments in successive frames. This feature is most useful when used with the Image Hose. When you apply a brushstroke to a movie using the Image Hose brush, one or more Nozzle images are deposited on each frame. If the Nozzle file is an animated sequence — for example, a person walking — Corel Painter can drop successive images on successive frames. Play the movie back, and the person walks across the document window. For this to work, you must set up the Nozzle file appropriately and have the right Image Hose brush size. For more information, refer to Getting Started with the Image Hose.
| To create a script for a movie |
1 |
Choose Window |
2 |
In the Scripts panel, click the Script Options button |
3 |
Perform the actions you want included in the script, and click the Stop button |
4 |
In the Script Name dialog box, type a name for the script in the Save As box.
|
| To apply a script to a movie |
1 |
Open the movie to which you want to apply the script.
|
2 |
Choose Window |
3 |
In the Scripts panel, click the Script Options button |
4 |
In the Apply Script to Movie dialog box, double-click a script.
|
Corel Painter applies that script to each frame in the stack. If you have few small frames in your movie, and the script is not a complicated one, the script can be applied quickly. If the movie has several large frames, a complicated script could take a long time. |
You can apply only scripts that do not create new images.
|
| To set grain position with a script |
1 |
Record a script that applies surface texture or dye concentration to an entire image.
|
2 |
Choose Movie |
3 |
In the Set Grain Position dialog box, enable one of the following options:
|
• |
Grain Stays Still — allows the grain to remain in the same position throughout
the movie
|
• |
Grain Moves Randomly — moves the grain as the movie plays. To use this
option, you must disable the Record Initial State option when recording your
script. In the Scripts panel, click the Script Options button |
• |
Grain Moves Linearly — increments the grain movement. Specify the number
of pixels you want the grain to move horizontally and vertically from one frame
to the next.
|
4 |
Click OK.
|
5 |
Choose Window |
6 |
In the Scripts panel, click the Script Options button |
| To apply a brushstroke script |
1 |
Choose Brushes |
2 |
Create a brushstroke in the document window.
|
3 |
Open a movie file.
|
4 |
Choose Movie |
You can composite two movies together into one — for example, you can composite a foreground action against a new background. To do this, you must create a selection in each frame of the foreground movie. For information about selections, refer to Creating and Saving Selections. You can also create an alpha channel for each frame and load it as a selection as you work. For more information, refer to Creating, Generating, and Importing Channels.
When creating selections in the foreground movie, if the background is uniform — all white, for example — you can take advantage of the automatic selection and script features.
The drawing mode determines whether Corel Painter draws inside or outside of a selection, so you can create selections that either include or exclude the foreground image — whichever is easiest — then set the drawing mode accordingly. For more information about drawing modes, refer to Protecting an Area of the Canvas.
When you composite movies, it can take a long time to generate selections and paint in the background for each frame. Using scripting in conjunction with the Auto Select or Color Select commands can make this operation much easier and faster.
You can create a selection based on image characteristics or color. You do this once, record the process as a script, and then apply the script to all frames in your movie. For information about creating selections based on image characteristics, refer to To generate a selection by using the Auto Select command. For information about creating selections based on color, refer to To generate a color-based selection. For information about recording scripts, refer to Scripting.
| To composite one movie with another |
1 |
Open the foreground movie.
|
If the Navigator panel is not open, choose Window |
2 |
In each frame, create a selection that defines the foreground image.
|
Because the foreground image continues to move, the selection in each frame must be different. |
3 |
In the Frame Stacks panel, click the Rewind button |
4 |
Open the background movie or image.
|
If the background is a movie, click the Rewind button. |
5 |
Select the background movie and choose Movie |
6 |
Select the foreground movie.
|
7 |
In the Navigator panel, click the Open Navigator Settings button |
• |
Draw Outside if you selected the portion of the image that you want to keep.
|
• |
Draw Inside if you selected the portion of the image that you want to replace.
|
You can also invert the selection instead of changing the drawing mode. |
8 |
Click the Brush Selector on the Brush Selector bar.
|
9 |
In the Brush Library panel, click the Cloners brush category, and click a brush
variant.
|
If you want to bring the background across perfectly, select the Straight Cloner brush variant. |
10 |
Paint in the foreground movie to replace the background by using the clone source.
|
11 |
Click the Step Forward button |
If your clone source is a movie, Corel Painter automatically advances the foreground and clone source movies by one frame. The movies stay synchronized as you proceed. |
12 |
Repeat step 10 for each frame in the movie.
|
If you want to automate the painting process, you can record the complete
painting of one frame as a script and then apply that script to the entire
movie. This assumes that the entire movie can use the cloned background. For
more information, refer to Applying Scripts to Movies.
|

The frame stack of the background movie.
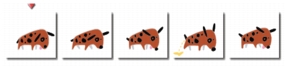
The frame stack of the foreground movie where selections of the dog are generated.
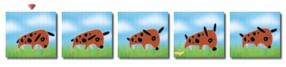
The composited movie.
| To composite movies using scripting |
1 |
Working in a sample image, determine whether Auto Select or Color Select works
best with your image.
|
Those selection methods are accessible by choosing Select |
2 |
When you’ve determined the settings for the best method, start over. This time,
record the Auto Select or Color Select process as a script.
|
To record a script, click Script Options button |
3 |
Open the frame stack in which you wish to create selections.
|
4 |
Choose Window |
5 |
In the Scripts panel, click the Script Options button |
6 |
In the Apply Script to Movie dialog box, double-click the Auto Select or Color
Select script you saved.
|
Corel Painter applies the script to each frame in the stack. |
Cloning from one movie to another is almost like cloning from one image to another. The only difference is that you are cloning from one sequence of frames to another sequence of frames. In this case, by advancing one frame in the clone frame stack, Corel Painter automatically advances one frame in the source frame stack.
When you set a movie clone source, the current frame in the clone is matched to the current frame in the source. If both movies are rewound to frame 1, the clone-to-source correspondence is 1-1, 2-2, 3-3. This means that the source for frame 1 in the clone movie is frame 1 in the source movie, and so on. If you like, you can create a different correspondence by choosing other frames before setting the movie clone source. For example, if the current frame of the clone movie is frame 1 and the current frame of the source movie is frame 5, the correspondence would be 1-5, 2-6, 3-7. This means that the source for frame 1 in the clone movie is frame 5 in the source movie, and so on. For information on cloning brushes, refer to Image Cloning and Sampling. You can control the areas cloned by setting up a selection in the clone movie. For complete information on creating selections, refer to Selections and Transformations.
You can also use Auto Clone to do the cloning, or you can record an Auto Clone script and apply the script to the new movie with a Cloner brush selected. For more information about using Auto Clone, refer to Using Auto Clone. For information about working with scripts, refer to Recording Scripts.
| To clone a movie |
1 |
Choose File |
2 |
In the Open (Mac OS) or Select Image (Windows) dialog box, note the information
on movie dimensions and number of frames given under the thumbnail window,
and click Open.
|
3 |
Create a new movie with the same dimensions and number of frames as the source.
|
With these two frame stacks open, you’re ready to clone the source into the new movie. |
4 |
Select frame 1 of the new movie.
|
5 |
With the source movie selected, choose the first frame you want to clone.
|
6 |
Choose Movie |
7 |
Select the new movie.
|
8 |
Using any Cloner brush, paint on the document window.
|
You will be painting the source movie into the clone. |
9 |
When you finish cloning in a frame, advance to the next one by clicking the Step
Forward button |
Corel Painter automatically advances the clone source to maintain the frame-to-frame correspondence. |
If you have a Corel Painter movie open and you choose File |
| To apply an Auto Clone script to a movie |
1 |
Record the Auto Clone effect on a sample image, and save the script.
|
2 |
Open the frame stack in which you wish to clone.
|
3 |
Choose Window |
4 |
In the Scripts panel, click the Script Options button |
5 |
In the Apply Script to Movie dialog box, select a saved Auto Clone script, and click
Playback.
|
Corel Painter clones the source movie into the destination movie. |
Have you ever wanted to animate your own cartoon, but didn’t know where to start? The Tracing Paper feature makes it possible to trace the contents of a movie into a brand-new animation.
For best results, the source should have the same frame rate you intend for the animation. For more information on frame rates, refer to Considering Frame Rate.
| To trace a movie |
1 |
Choose File |
2 |
In the Open (Mac OS) or Select Image (Windows) dialog box, note the movie
dimensions and number of frames information under the thumbnail window, and
click Open.
|
3 |
Create a new movie with the same dimensions and number of frames as the source.
|
With these two frame stacks open, you’re ready to trace the source into the new movie. |
4 |
Select the source movie, and click the Rewind button |
5 |
Choose Movie |
6 |
Select the new movie and choose Canvas |
The first frame of the original movie appears ghosted in the first frame of the new movie. |
7 |
Trace the first frame using any of the Corel Painter tools, textures, and effects.
|
8 |
When finished, click the Step Forward button |
9 |
Continue frame by frame.
|
|
|
Copyright 2012 Corel Corporation. All rights reserved.