Quick links to procedures on this page:
• |
• |
• |
• |
• |
• |
• |
• |
• |
• |
• |
• |
• |
Corel Painter lets you add interesting and specialized Esoterica effects. You can also apply mosaic effects and tessellation. For more information, see Mosaics.
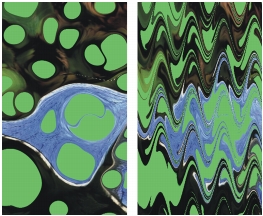
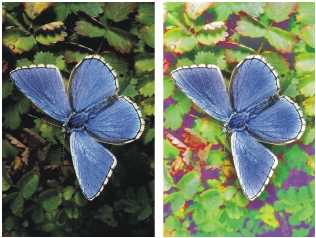
The Marbling effect creates intricate distortions of an image, following a technique that dates back to the 12th century. Marbling is created by dragging a fork, or rake, across an image, which produces an effect similar to a fork dragging through a mix of chocolate syrup and melted ice cream.
Before (left) and after (right) applying the Marbling effect.
Each time you drag a rake across an image, you create a step. You can create marbling “recipes” that include several steps — each one using a different rake, direction, and waviness. You can save marbling recipes and reuse them.
Marbling works best with patterns or textures. The Blobs effect is an excellent way of creating the raw materials for marbling; filling with a pattern is another. Refer to Applying Blobs for more information on the Blobs effect.
| To create a marbling recipe |
1 |
Select a layer or area of the canvas.
|
If you want to apply the effect to the entire image, do not make selection. |
Selections can help you control the marbling when you have a particular effect in mind. For example, the rake path normally begins from the edge of the image. If you want the rake path to begin in the center of a blob, select an area that begins at the blob’s center. |
2 |
Choose Effects |
3 |
In the Apply Marbling dialog box, choose a Direction option for the rake stroke.
|
4 |
Create a rake stroke by adjusting any of the following sliders and clicking
Add Step:
|
• |
Spacing — adjusts the distance between rake teeth. The slider controls the
number of teeth in the rake. When the slider is all the way to the right, the rake
has one tooth.
|
• |
Offset — moves the rake in a perpendicular direction to the path direction. Use
this slider to adjust the position of the rake lines.
|
• |
Waviness — changes the amplitude (height) of the waves. When this slider is
set to zero, the path is straight.
|
• |
Wavelength — determines the distance between wave peaks
|
• |
Phase — moves the wave in the rake direction. This lets you set where in the
curve (peak, downslope, valley, or upslope) the rake begins in the image.
|
• |
Pull — controls how much the rake distorts the image. Lower values produce
thin, short distortions. Higher values create stronger distortions.
|
• |
Quality — lets you control the smoothness in the marbled image. Low settings
produce an aliased effect. The marbling looks rough with scattered pixels.
Increasing the Quality setting adds anti-aliasing, making color distortions
appear smoother and more fluid.
|
As you adjust the sliders, the dotted lines in the preview window show the rake path. |
5 |
Repeat steps 3 and 4 for each rake step you want to create.
|
The Apply Marbling dialog box displays the current step number and the total number of steps in the recipe. You can move between steps by clicking the forward and backward arrow buttons. |
![]()
Steps are applied in order, so subsequent steps are based on the result of each
previous one.
|
The final look of the marble largely depends on whether you start horizontally
or vertically, and whether you work with a fine comb or a coarse rake.
|
Each step you add increases the time it takes to apply the recipe.
|
| To modify, save, or load a recipe |
The Auto Clone effect automatically applies brush dabs to your image. The types of dabs depend on the currently selected brush. The color is picked up from the clone source. Unlike most other effects, Auto Clone has no dialog box, using the current brush settings and the clone color instead.
The best way to produce a Natural-Media version of an image is to first clone it and then choose a brush that produces artistic dabs. The Driving Rain variant of the Cloner brush works well for generating a hand-drawn look. The Seurat variant of the Artists brush also works well.
In this example, the Seurat variant was used with the Auto Clone effect.
If you apply Auto Clone to a large area, the paint may fill smaller rectangular tiles one at a time. If you click to stop Auto Clone, it won’t automatically finish the final tile of the overall selected area. To fill in non-rectangular areas, you can use Auto Clone with a selection. For more information, refer to Creating and Saving Selections.
When you use Auto Clone with the Felt Pen Cloner and other tools that turn black as you repeat strokes, areas darken rapidly. By dimming your original image, you can slow down the color buildup and still use Auto Clone.
Another way to automate cloning is by recording and playing back individual brushstrokes. This feature is especially useful for filling in backgrounds. For more information, refer to Recording and Playing Back Brushstrokes. For information on cloning, refer to Image Cloning and Sampling.
| To automatically fill an area with cloned brushstrokes |
1 |
Open an image file to use as a clone source.
|
2 |
Choose File |
3 |
Click the Brush Selector on the Brush Selector bar.
|
4 |
In the Brush Library panel, click the Cloners brush category, and then choose a
brush variant.
|
If you want to apply the effect to only a portion of your image, choose a Selection tool from the toolbox and make a selection. |
If nothing is selected, the entire image is affected. |
5 |
Choose Effects |
Dabs of paint are automatically applied to the selected area. |
6 |
Click anywhere in the image to turn off Auto Clone.
|
If you apply Auto Clone to a large area, the paint may fill areas sparsely.
When you click to stop Auto Clone, it stops at that point. It won’t continue
to fill the selected area. To fill an area completely, you must let the Auto Clone
continue.
|
If you use a variant with Auto Clone that isn’t a Cloner variant, you can click
Clone Color in the Color panel to make it pick up color from the source
document. For more color variety in the dabs Corel Painter applies, set the
±H, ±S, and ±V sliders in the Color Variability panel to 15% each.
|
The Auto Van Gogh effect works with the Auto Van Gogh variant of the Artists brush. This algorithmic approach to placing directional brushstrokes results in a Van Gogh–like rendition of an image.
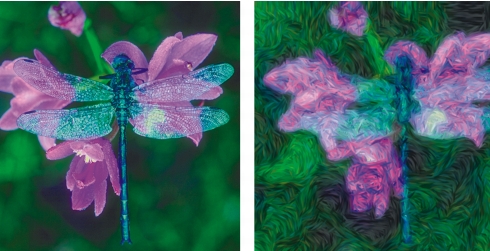
The Auto Van Gogh effect.
The effect requires two passes. The first pass determines the angles of the brush dabs. The second pass applies the dabs. The image is then rendered in a set of directional brushstrokes.
| To apply Auto Van Gogh to an image |
1 |
Select the image you want to clone.
|
2 |
Choose File |
3 |
Click the Brush Selector on the Brush Selector bar.
|
4 |
In the Brush Library panel, click the Artists brush category, and then click the Auto
Van Gogh brush variant.
|
5 |
In the Color Variability panel, adjust any controls.
|
6 |
Choose Effects |
The Blobs effect creates a pattern similar to oil floating on water. The effect takes a source and puts it in a swirling pattern by placing blobs on the image. The underlying image is distorted as if it were liquid.
You can use one of three sources to fill in the blobs:
• |
Paste Buffer uses the current contents of the Clipboard to fill in the blobs. You can
produce blobs that look like bubbles by creating a circular selection that’s shaded
like a sphere, and then copying it to the Clipboard.
|
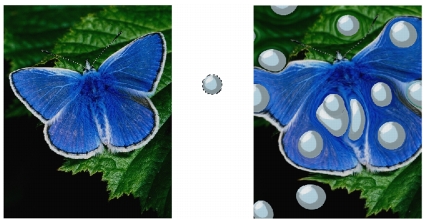
Before (left) and after (right) applying a Blob effect created from Clipboard contents.
• |
Current Color uses the color selected in the Color panel to fill the blobs.
|
A Blob effect created from the Current Color source.
• |
Pattern uses the current pattern in the Patterns panel to fill in blobs.
|
Blobs create a nice basis for the Marbling effect because they create interesting color patterns. You may want to apply this effect to your original image before applying Marbling. For more information about marbling, refer to Applying Marbling.
| To apply a blob effect |
1 |
Do one of the following:
|
• |
To use the Clipboard contents to fill the blobs, make a selection and press
Command + C (Mac OS) or Ctrl + C (Windows) to copy the selection to the
Clipboard.
|
• |
To use the current color to fill the blobs, choose a color in the Color panel.
|
• |
To use a pattern to fill the blobs, choose a pattern in the Patterns panel.
|
2 |
Open the image, or select the image area, in which you want to create the blobs.
|
3 |
Choose Effects |
4 |
In the Create Marbling Stone Pattern dialog box, specify the number of blobs.
|
5 |
Specify the minimum and maximum sizes of the blobs.
|
6 |
Enter a value in the Subsample box to set the number of anti-aliasing steps.
|
7 |
Choose a source from the Fill Blobs With list box.
|
8 |
The value in the Seed box is used in randomizing the blobs.
|
Each time you apply the effect, a different seed number is generated. You may enter a specific number if you like. |
This effect turns your image into tiles. Corel Painter generates tiles based on a preset pattern, like bricks or hexagons, or from a paper pattern, clone source, or channel. If you use a preset pattern, the tiles are uniform in size and cover the entire image evenly.
The color of each tile is determined by applying the average color of the image pixels it covers.
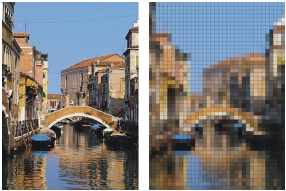
Before (left) and after (right) applying tiles generated from a preset pattern.
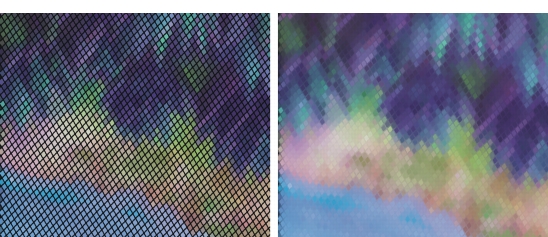
When you generate tiles from either a paper pattern, clone source, or channel, tiles are based on light and dark concentrations in the selected source. In this case, the shape of the tiles is varied and may not cover your image evenly.

Tiles generated from a paper pattern.
The Custom Tile effect functions differently from the Mosaic and Tessellation features. For more information on Mosaics and Tessellations, refer to Getting Started with Mosaics.
| To apply custom tiles |
1 |
Select a layer or area of the canvas.
|
If you want to apply the effect to the entire image, do not make selection. |
2 |
Choose Effects |
3 |
In the Custom Tile dialog box, choose a tile pattern or source from the Using list
box.
|
4 |
Adjust any of the following pattern properties:
|
• |
For Brick, use the Brick Width and Brick Height sliders to adjust the size of the
bricks.
|
• |
For the other built-in tile shapes, use the Angle and Scale sliders to adjust the
tile orientation and size.
|
• |
For Original Luminance, Paper, and channel or layer mask, use the Threshold
slider to draw the line between “light” and “dark.” Everything above the
Threshold value becomes tiles, and everything below becomes grout.
|
5 |
Adjust the Thickness slider to control the width of the cracks between tiles (grout
lines).
|
6 |
Adjust the Blur Radius slider to set the sampling radius for blurring the crack or
grout color. Increasing the Blur Radius adds more neighboring colors to the crack
pixels in each pass.
|
7 |
Adjust the Blur Passes slider to set the number of times the crack pixels are blurred.
More passes mix more tile color into the cracks. Blurring occurs only when Blur
Passes is greater than zero.
|
The original grout appearance (left) is changed by blurring (right).
If you want grout to show between the tiles, enable the Use Grout check box. |
8 |
Click the Color chip, and choose a grout color from the Color dialog box.
|
The Grid Paper effect adds a grid of horizontal lines, vertical lines, rectangles, or dots to an image.
Unlike the Grid Overlay, which is a transparent layer that floats as a reference above your image, Grid Paper becomes part of your image. For this reason, the Transparent Background option, used for the Grid Overlay, is not available for Grid Paper.
| To apply Grid Paper |
1 |
Choose Effects |
2 |
In the Grid Options dialog box, choose a grid type from the Grid Type list box.
|
3 |
Set the grid dimensions by entering values in the following boxes:
|
• |
Horizontal Spacing — determines the amount of space between horizontal lines
|
• |
Vertical Spacing — determines the amount of space between vertical lines
|
• |
Line Thickness — sets the width of grid lines
|
4 |
Click the Grid Color chip, and choose a color from the Color dialog box to set the
grid color.
|
5 |
Click the Background chip, and choose a color from the Color dialog box to set the
background color.
|
The Growth effect generates branchlike designs from a central point and adds them to your image. The designs resemble architectural renderings of trees.
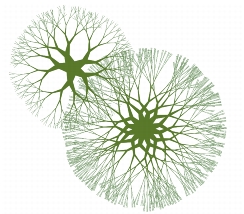
Examples of Growth patterns.
Growth patterns are created from the current main color. You have access to the Color panel while the Growth dialog box is open, so you can change the main color at any time.
| To create growth patterns |
1 |
Choose a color in the Color panel.
|
2 |
Choose Effects |
3 |
In the Growth dialog box, enable any of the following check boxes:
|
• |
Hard Edges — creates growth patterns with hard edges; disable to create
growth patterns with soft, feathery edges
|
• |
Fractal — creates open-ended (fractal) patterns; disable to create nonfractal
patterns, which are closed on the outside by a ring
|
4 |
Use the following guidelines to adjust the sliders:
|
• |
Flatness — reshapes the growth pattern like a lens effect. Move the slider to the
left for a concave lens effect. Move the slider to the right for a “fish-eye” lens
effect.
|
• |
Thinout — affects how the size of the growth pattern is distributed from the
center to the outside edges. At settings over 100%, the outside edges become
thicker. At settings under 100%, the edges become finer and more delicate.
|
• |
Random — affects how symmetrical the growth patterns appear. Lower values
generate straight-line, geometrical designs. Higher values generate distorted,
crooked designs.
|
• |
Thickness — uniformly adjusts the weight of the lines within the design. Move
the slider to the left for thinner lines, and to the right for thicker lines. The
growth pattern cannot be made thinner than one pixel.
|
• |
Branch — determines how many branches come from the center to the outside
edge. The range is 1 through 20.
|
• |
Max Level — determines the number of levels or sublevels that appear in the
tree. Specifically, Max Level determines how the branches split to the outside
edge.
|
• |
Fork — adjusts the overall intricacy of the outermost branches
|
• |
Fork Ratio — is like Fork, but it affects only the tips of the outermost branches
|
5 |
Without closing the Growth dialog box, drag to create a growth pattern in the
document window.
|
As you drag, you see the outline of the growth pattern. When you release, the pattern is created. |
6 |
Do one of the following:
|
• |
To apply the current growth pattern, click OK.
|
• |
To discard all patterns, click Cancel.
|
When you click Cancel, all the growth patterns you have created since you opened the Growth dialog box are deleted. It’s a good idea to click OK to save each pattern you create. |
The sliders in the Growth dialog box affect both fractal and nonfractal growth
patterns in a similar way, with the exception of Fork and Fork Ratio, which
affect only fractal growth patterns.
|
The Highpass effect suppresses low-frequency areas containing gradual or smooth transitions of brightness levels. This leaves high-frequency areas, or just the edges of an image, containing stark shifts between brightness levels.
Highpass uses either the Gaussian or Circular aperture options. Gaussian aperture affects the red, green, and blue components of color; Circular aperture uses image luminance. You can make the highpass more pronounced by using the Equalize effect.
The Highpass effect introduces stark shifts between brightness levels.
| To apply a Highpass effect |
1 |
Select a layer or area of the canvas.
|
If you want to apply the effect to the entire image, do not make a selection. |
2 |
Choose Effects |
3 |
In the Highpass dialog box, choose an aperture option.
|
4 |
Move the Amount slider to determine how much to suppress the low-frequency
areas.
|
This value defines a radius, in pixels, around each pixel in the selected image area. Moving the slider to the left suppresses larger amounts of low-frequency information. Moving the slider to the right suppresses smaller amounts of low-frequency information. |
The Maze effect generates an image of a maze. Typically, you’ll create a maze in a new, blank image. Each maze has one “solution” — that is, an open path from the entrance to the exit.
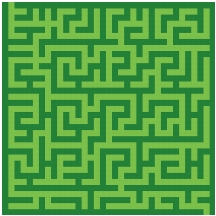
The Maze effect produces interesting designs.
You can capture a portion of the maze as a pattern or paper texture, or use the maze as a source for other effects. Mazes must be rectangular and cannot be applied to non-rectangular selections.
| To apply a Maze effect |
1 |
Select a layer or area of the canvas.
|
If you want to apply the effect to the entire image, do not make a selection. |
2 |
Choose Effects |
3 |
In the Maze dialog box, enable any of the following check boxes:
|
• |
Patterned — constrains barriers to the horizontal
|
• |
Display Solution — displays the path from the entrance to the exit
|
4 |
Enter a value in the Seed box to generate a random maze pattern.
|
5 |
Enter a value in the Thickness box to set the width of barriers and paths.
|
6 |
Click the Maze Color chip, and choose a maze color from the Color dialog box.
|
7 |
Click the Background chip, and choose a background color from the Color dialog
box.
|
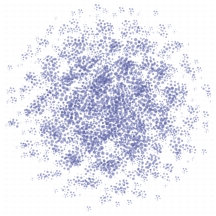
Place Elements is an effect designed to automate the application of brush dabs. It’s particularly useful with the Image Hose brush. For more information on the Image Hose, refer to Getting Started with the Image Hose.
An example of the Place Elements effect used with the Image Hose.
Place Elements creates a virtual sphere within the confines of a selection rectangle. When the selection is square, the sphere is perfectly round; when the selection is rectangular, the sphere is elongated or flattened.
A number of points are created at random locations on the sphere. The points are then distanced from each other, and a brush dab is placed at each point. Each dab’s appearance is adjusted according to its location on the sphere.
An example of the Place Elements effect used with a brush.
| To place elements |
1 |
Choose the Rectangular Selection tool |
2 |
Drag to create a selection.
|
This selection determines the location and size for the effect. |
3 |
Do one of the following:
|
• |
If you want to use the Image Hose, choose a nozzle from the Nozzle selector on
the toolbox.
|
• |
If you want to apply paint dabs, select a brush and choose a main color.
|
4 |
In the Color panel, set the additional color to black.
|
The effect automatically controls mixing of the additional color with Nozzle elements to produce depth shading. Shadows tend toward black, so black is a good color to use. |
5 |
Choose Effects |
6 |
In the Place Elements dialog box, enter a number in the No. of Iterations box.
|
In each iteration, the points distance themselves from each other on the surface of the virtual sphere. The points start at random locations, so if you set zero as the number of iterations, the placement of the points is completely random. Higher numbers of iterations increase the regularity of the spacing. |
7 |
Adjust the Points slider to set the number of points to create on the virtual sphere.
|
Each point created correlates to an image element placed. |
8 |
Enable a Number of Levels option.
|
• |
With one level, each point receives only one element.
|
• |
With two levels, each point receives an element and then is used as the center
for another virtual sphere on which point iteration and element placement
repeats.
|
• |
The third level extends sphere creation and element placement once more.
|
The number of elements increases rapidly with more than one level. For example, if you choose 12 points and three levels, you’ll create 12 + (12 × 12) + (12 × 12 × 12) = 1,884 elements. Of course, many of these elements will probably be covered by later placements. |
9 |
Adjust the Radius Fraction slider.
|
Radius Fraction determines the size of the virtual spheres created at the second and third levels. The first-level radius is multiplied by the fraction amount to determine the radius of the second-level spheres. |
The fraction is used again between the second and third levels. Higher values (above 1.0) increase overlapping of the spheres. Lower values (below 1.0) preclude overlapping (when sufficient iterations are used to distribute the points). |
10 |
Adjust the Oversizing slider.
|
Oversizing controls the diameter of the first-level virtual sphere in relation to the selection marquee. |
At a setting of 2.5, the sphere fits within the selection. Higher settings shrink the sphere. Lower settings stretch it beyond the selection. |
11 |
Adjust the Ambient Amount slider.
|
Ambient Amount controls the use of the additional color in elements that appear on the virtual sphere away from the light source. This is how the clump of placed elements exhibits coherent three-dimensional shading when black is used as the additional color. The default setting is 0.7, which produces good shading results. Increasing the value brings in more of the additional color. Decreasing it reduces additional color mixing. |
If you have chosen two or three levels, you can prevent overlapping elements
by enabling the Cull Interiors check box. This removes points that occur
inside other spheres, before elements are placed. This option increases
processing time for the effect.
|
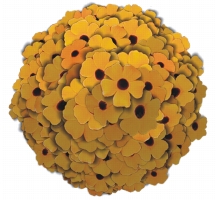
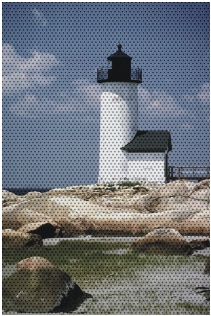
This effect lets you cover an image with pseudo-halftone dots. You can also use the Pop Art Fill effect with other Corel Painter features and effects to create a pop art image.
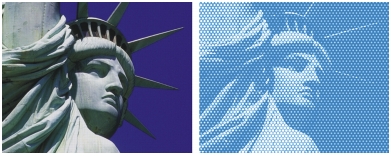
Before (left) and after (right) applying the Pop Art Fill effect.
| To apply Pop Art Fill |
1 |
Select a layer or area of the canvas.
|
If you want to apply the effect to the entire image, do not make a selection. |
2 |
Choose Effects |
3 |
In the Pop Art Fill dialog box, choose a source from the Using list box.
|
If you want to work with an inverted version of the source, enable the Inverted check box. |
4 |
Adjust the Scale slider to set the dot size.
|
5 |
Adjust the Contrast slider to mix in the luminance of the control medium.
|
This is particularly useful when using Image Luminance. |
6 |
Click the Dab Color chip and choose a dot color from the Color dialog box.
|
| To create a pop art image |
1 |
Open an image, and choose File |
2 |
Choose Effects |
3 |
In the Adjust Color dialog box, drag the Saturation slider all the way to the left,
and click OK.
|
4 |
This reduces the image to grayscale.
|
5 |
Choose Effects |
6 |
In the Pop Art Fill dialog box, click the Dab Color chip and choose black from the
Color dialog box.
|
7 |
Click the Background chip and choose white from the Color dialog box.
|
8 |
Adjust the Scale slider, and click OK.
|
The Pop Art Fill effect is applied to the clone. |
9 |
Choose Select |
10 |
Choose Select |
11 |
Choose Edit |
12 |
Close the clone file.
|
13 |
In the original image file, choose Edit |
The copied layer is pasted into the original image file. |
14 |
In the Layers panel, choose Darken from the Composite Method list box.
|
This makes the background image visible through all white areas of the Pop Art Fill layer. |
If you want to change the colors in the image, deselect the layer in the Layers
panel, and apply an effect.
|
A pop art image with the Express Gradient and Posterize effects applied.
|
|
Copyright 2012 Corel Corporation. All rights reserved.