Quick links to procedures on this page:
• |
In Corel Painter, you work mainly with bitmaps, or raster images. Bitmaps are composed of tiny squares called pixels; each pixel is mapped to a location in an image and has a numerical color value. The location and color value data are stored as bits — hence, the name bitmaps.
Shapes are vector objects, and you can work with them in Corel Painter in much the same way you work with vector objects in drawing programs like CorelDRAW and Adobe Illustrator. For more information, see Acquiring Shapes from Adobe Illustrator. Vector graphics are made up of lines, curves, objects, and fills that are all calculated mathematically.
Corel Painter draws shapes in an anti-aliased fashion. This anti-aliasing gives objects a smooth edge, as opposed to the jagged edges apparent in some drawing programs. Some clipart objects actually look like photographic elements when they are imported into Corel Painter and displayed with anti-aliasing.
Anti-aliased shapes are typically slower to appear on the screen in Corel Painter than are aliased objects in drawing programs, so you may want to use your drawing program for most of your object creation. You can then import the vector artwork into Corel Painter, tweak it with the drawing tools, and add some Natural-Media effects.
Shapes in Corel Painter can be interleaved with pixel-based layers, so you can layer both styles of artwork in a single composition. You can convert vector objects and groups into pixel-based layers and use any of the effects or painting tools on these floating objects to create Natural-Media artwork.
You can also convert shapes to selections and vice versa. The tools for adjusting shapes allow precise control over the outline path, so you may want to use shapes to create some of your selection paths. For more information about selections, refer to Selections and Transformations.
In Corel Painter, shapes are implemented as layers. When you create a shape, a new layer is added to your document. The shapes you create are listed in the Layers panel. Many of the options and controls for working with pixel-based layers apply equally to shapes. For example, you can move shapes in the same way you move layers, you can apply effects to shapes, and you can change the composite method to control how the shape interacts with the underlying image.
Shapes follow the same layering rules as pixel-based layers, and you can manipulate them in many of the same ways. Shapes differ from pixel-based layers by the type of data they contain. Shapes are vector objects; pixel-based layers are constructed of pixels.
If you want to work with pixel information in a shape, you can convert the shape to a pixel-based layer. In many cases, Corel Painter will do this for you automatically. For example, if you want to apply a fill to a shape, Corel Painter asks if you want to commit the shape to an image layer. You can also deliberately convert a shape or group of shapes to a pixel-based layer.
For more information about layers, refer to Layers.
| To convert a shape to a pixel-based layer |
1 |
Choose the Shape Selection tool |
2 |
Click the shape to select it.
|
3 |
Do one of the following:
|
• |
Choose Shapes menu |
• |
Click the Convert To Layer button |
• |
In the Layers panel, click the shape’s layer, click the Layer Options button |
You can paint a shape, but you must first convert the shape to a pixel-based
layer. For more information, see Painting Shapes.
|
The paths used to create shapes are known as Bézier lines. They can be straight or curved, and they consist of anchor points connected by line segments.
When the path is a curve, “wings” extend from the anchor points. The wings are represented by a straight line and are tangent to the curve. The wings have control “handles” on them. By dragging the wing handle, you can change the curvature of the line segment.
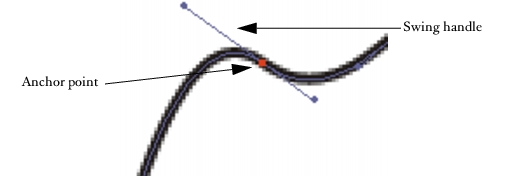
Paths can be modified by using anchor points and wing handles.
Shapes can be open (with endpoints) or closed (without endpoints).
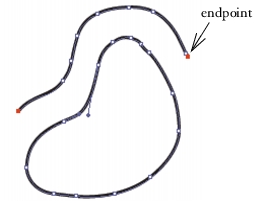
Open paths contain endpoints; closed paths do not.
Anchor points can be either smooth or corner points. A smooth point allows you to manipulate the segments on both sides of an anchor point by dragging a handle. A corner point restricts the manipulation of the segments to the one side of the anchor point that has a handle. For information about converting smooth or corner anchor points, see To convert a smooth or corner point.
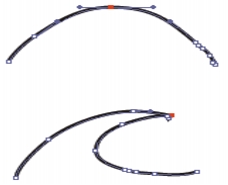
An anchor point can be a smooth point (top) or a corner point (bottom).
|
|
Copyright 2012 Corel Corporation. All rights reserved.